Connect is an extensible HTTP server framework for node using “plugins” known as middleware.
这是引自Connect官方仓库的一段文字,可以看到:Connect是一个服务器端框架。在Connnect中,中间件是一个函数,它拦截HTTP服务器提供的请求和响应对象,执行特定的逻辑,然后结束响应或者把她传递给下一个中间件组件。
Express也是一个Web框架,官方是这样介绍的:
Fast, unopinionated, minimalist web framework for Node.js.
前期版本中,Express框架是构建在Connect之上,但是在最新的4.x版本中,我们引述了下面这段话:
Express 4 no longer depends on Connect, and removes all built-in middleware from its core, except for the express.static function. This means that Express is now an independent routing and middleware web framework, and Express versioning and releases are not affected by middleware updates.
但是,对Connect的介绍仍对我们理解Express很有帮助。
Connect
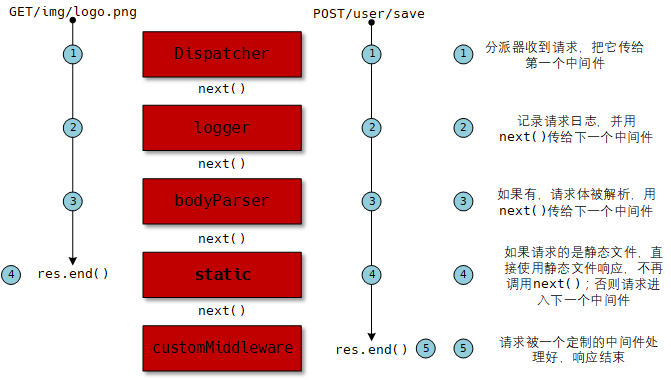
两个HTTP请求穿过Connect服务器生命周期如下图。
安装Connect
Connect是一个第三方模块,所以需要下载安装。
$ npm install connect
则,我们可以创建一个最小的Connect程序。
var connect = require ('connect');
var app = connect();
app.listen(3000);
中间件 – Middleware
Connect的核心就是中间件。在Connect中,中间件组件是一个JavaScript函数,按惯例会接受三个参数:req、res、next。这是一个回调函数,如果没有下一个中间件,next参数是不必要的。类似这种:
app.use(function middleware1(req, res, next) {
  // middleware 1
  next();
});
app.use(function middleware2(req, res, next) {
  // middleware 2
  next();
});
那么如何挂载中间件呢?我们使用.use()函数。
挂载中间件 – Mount middleware
使用挂载中间件,你可以在.use()函数中接受一个路径前缀。
app.use('/foo', function fooMiddleware(req, res, next) {
  // req.url starts with "/foo"
  next();
});
app.use('/bar', function barMiddleware(req, res, next) {
  // req.url starts with "/bar"
  next();
});
也是说,我们第一个中间件我们将它挂载在/foo路径上,代码中/xxx/xxx的req.url通过浏览器访问就是/foo/xxx/xxx。也就是说,这可以很方便的让我们重用代码。
差错中间件 – Error middleware
Connect中,有一个特殊的Error middleware来处理程序错误。它接受四个参数: err、req、res、next。
// regular middleware
app.use(function (req, res, next) {
  // i had an error
  next(new Error('boom!'));
});
app.use(function (req, res, next) {
  next();   //skipped
});
app.use(function onerror(err, req, res, next) {
  // an error occurred!
});
第一个中间件抛出了一个错误,而第二个中间件从它的表现看来并不错误处理中间件,所以它会skipped直到Connect看到一个差错处理中间件。
可配置的中间件
创建更通用的、可重用的中间件是非常有必要的。为此,中间件通常会遵循一个简单的惯例: 用函数返回另一个函数(也就是闭包)。结构类似这种:
function setup (options){
    //设置逻辑
    return function(req,res,next){
        //中间件逻辑
    }
}
这种中间件的用法如下:
app.use (setup({some:'options'}))
已经不是Connect自带的中间件
在新的版本中,以前是Connect内置的中间件都被移除了。Express 4.x也移除了自带的中间件(所以说,Express 4.x已不再依赖Connect了),除了express.static函数,并对其中一些命名进行了更新。以下的中间件被Connect和Express同时官方支持,且已是第三方模块。
- body-parser – 解析请求体
- compression – Node.js压缩中间件
- connect-timeout – 在Connect/Express应用框架中将请求超时
- cookie-parser – 解析cookie
- csurf – Node.js CSRF保护中间件
- errorhandler – 仅在开发期间的差错控制中间件
- express-session
- method-override – 当你的客户端不支持HTTP谓词的时候你可以使用它
- morgan – 请求日志中间件
- response-time
- serve-favicon – 提供favicon的中间件
- serve-index – 提供包含给定路径的页面
- server-static
- vhost
Express
Express也是一个第三方模块,所以全局或项目依赖安装。
$ npm install express --save
在目录下,我们创建一个app.js(或者index.js)作为入口文件,我们来创建一个最简单的hello world程序。
//app.js
const express = require('express');
const app = express();

app.get('/', function (req, res) {
  res.send('Hello World!');
})

app.listen(3000, function () {
  console.log('Example app listening on port 3000!');
})
我们使用$ node app.js运行这个应用。那么,它会开启服务器,并在3000端口进行监听。当我们使用浏览器访问http://localhost:3000地址发送GET请求,应用就会响应Hello World。
使用Express application generator生成程序骨架
在4.x版本中,express-generator从express中独立出来。同时,它也是express的一个命令行工具。我们将这个模块进行全局安装。
$ npm install express-generator -g
然后我们使用如下命令:
λ express --view=pug myblog

   create : myblog
   create : myblog/package.json
   create : myblog/app.js
   create : myblog/public
   create : myblog/routes
   create : myblog/routes/index.js
   create : myblog/routes/users.js
   create : myblog/views
   create : myblog/views/index.pug
   create : myblog/views/layout.pug
   create : myblog/views/error.pug
   create : myblog/bin
   create : myblog/bin/www
   create : myblog/public/images
   create : myblog/public/javascripts
   create : myblog/public/stylesheets
   create : myblog/public/stylesheets/style.css

   install dependencies:
     > cd myblog && npm install

   run the app:
     > SET DEBUG=myblog:* & npm start
Express还支持
jade、ejs等多种模板引擎。其中,默认为jade。因为版权之争,jade更名为Pug,我的猜测是,Express的默认模板引擎也会更改为Pug。
命令中我们使用pug作为我们的模板引擎,创建myblog项目。结构如下:
│  app.js
│  package.json
│
├─bin
│      www
│
├─public
│  ├─images
│  ├─javascripts
│  └─stylesheets
│          style.css
│
├─routes
│      index.js
│      users.js
│
└─views
        error.pug
        index.pug
        layout.pug
打开package.json会发现,入口文件是./bin/www,而且包含众多依赖项。所以我们需要用npm install安装依赖项,然后运行这个应用。
λ npm install
λ SET DEBUG=myblog:* & npm start
此时,应用已经监听在3000端口,可以通过浏览器http://localhost:3000访问。
备注:SET DEBUG=myblog:*是什么意思?
接下来,我们重点看一下app.js中的内容,如下:
//app.js
var express = require('express');
var path = require('path');             //Node自带的模块
var favicon = require('serve-favicon'); //Node.js提供图标的中间件
var logger = require('morgan');         //Node.js提供HTTP请求logger的中间件
var cookieParser = require('cookie-parser');//解析Cookie header的中间件
var bodyParser = require('body-parser');//解析请求体的中间件

var index = require('./routes/index');  //默认的路由,和app.use('/', index)关联
var users = require('./routes/users');  //默认的路由,和app.use('/users', users)关联

var app = express();                    //生成express实例

// view engine setup,模板引擎设置
app.set('views', path.join(__dirname, 'views'));//__dirname表示目录所在的绝对路径,以我的为例是,C:\Users\timi\node-vscode\inaction\express-test\myblog
app.set('view engine', 'pug');  //使用Pug作为模板引擎

// uncomment after placing your favicon in /public
//app.use(favicon(path.join(__dirname, 'public', 'favicon.ico')));  //设置favicon.ico图标,如果有的话,取消这句的注释
app.use(logger('dev'));                 //日志显示,可替换的参数有combined、common、dev、short、tiny。具体参见: https://www.npmjs.com/package/morgan
app.use(bodyParser.json());             //只解析json并只查看Content-Type满足type的请求。具体参见: https://www.npmjs.com/package/body-parser#bodyparserjsonoptions
app.use(bodyParser.urlencoded({ extended: false }));    //只解析URL-encoded bodies。具体参见: https://www.npmjs.com/package/body-parser#bodyparserurlencodedoptions
app.use(cookieParser());    //cookie解析
app.use(express.static(path.join(__dirname, 'public')));    //Express唯一的内建的中间件,用来提供静态文件,都放在public文件中,具体参看Express API

//路由处理
app.use('/', index);
app.use('/users', users);

// catch 404 and forward to error handler
//如果没有静态文件,没有找到被路由处理的文件,则交给它来处理。
app.use(function(req, res, next) {
  var err = new Error('Not Found');
  err.status = 404;
  next(err);
});

// error handler
//差错控制中间件
app.use(function(err, req, res, next) {
  // set locals, only providing error in development
  res.locals.message = err.message;
  res.locals.error = req.app.get('env') === 'development' ? err : {};

  // render the error page
  res.status(err.status || 500);
  res.render('error');
});

module.exports = app;
请对照我们在Connect这一节中的第一个图,Express应用使用中间件的顺序和图是一致的。比如,浏览器请求静态文件。服务器收到请求,将它传递给favicon中间件,然后交由logger中间件,如果有,请求体就会被解析,然后用静态文件进行响应。如果没有,就交由差错控制中间件。
上面这个文件涵盖了大部分的Express的内容。所以我们需要对上面的几个关键概念进行阐述。
路由
路由指的是一个由URL或者path和HTTP request method,用来响应客户端对某个站点的访问。
简而言之,它会把请求URL映射到实际业务逻辑的函数上
路由定义由如下的结构:
app.METHOD(PATH, HANDLER)
其中,app是express的实例。METHOD是HTTP request method(get/post/head/put/delete...)。PATH是服务器上的地址。HANDLE是路由匹配到时的执行函数,可以有多个。
下面时一个基本的路由例子:
app.get('/', function (req, res) {
  res.send('Hello World!');
});
Route methods
Express支持所有的HTTP methods: get, post, put, head, delete, options, trace, copy, lock, mkcol, move, purge, propfind, proppatch, unlock, report, mkactivity, checkout, merge, m-search, notify, subscribe, unsubscribe, patch, search, and connect.
有一个特殊的Route method是app.all(),用来为所有的request methods加载中间件。
Route paths
Route paths可以是字符串、字符串模式或者正则表达式。
Route handlers
Route handlers可以像中间件一样使用多个回调函数。一个例外是这些回调函数可能会调用next()来跳过剩下的路由回调函数。
响应对象(res)能发送响应给客户端,并终止request-response cycle。res对象的方法有:
res.download(): 提供可供下载的文件res.end(): 结束响应res.json(): 发送一个JSON响应res.jsonp(): 发送一个JSONP支持的JSON响应res.redirect(): 重定向一个请求res.render(): 渲染一个模板视图res.send(): 发送一个多类型的响应res.sendFile(): 以八字节发送一个文件res.sendStatus(): 发送响应状态字
如果上述方法没有一个被调用,则客户端请求被悬挂。
app.route()
通过app.route(),我们可以创建一个链式的route handlers,这样可以避免很多冗余。
app.route('/book')
  .get(function (req, res) {
    res.send('Get a random book')
  })
  .post(function (req, res) {
    res.send('Add a book')
  })
  .put(function (req, res) {
    res.send('Update the book')
  })
express.Router
express.Router类可以创建模块化的,可挂载的route handlers,一个Router实例完全就是一个中间件和路由系统。
举例,我们创建一个路由文件birds.js。
//birds.js
var express = require('express')
var router = express.Router()

// middleware that is specific to this router
router.use(function timeLog (req, res, next) {
  console.log('Time: ', Date.now())
  next()
})
// define the home page route
router.get('/', function (req, res) {
  res.send('Birds home page')
})
// define the about route
router.get('/about', function (req, res) {
  res.send('About birds')
})

module.exports = router
然后,我们在主文件app.js中加载这个路由模块。
//app.js
var birds = require('./birds')
// ...
app.use('/birds', birds)
这样,服务器就能响应客户端的/birds和/birds/about,并调用timeLog中间件。
遇到的Bug
Refusing to install xxx as a dependency of itself
原因是安装的依赖包和项目名称有冲突,可以在package.json中修改name属性。
如何使用Express命令行工具
在最新的4.x版本中,express generator从express core中独立出来,需要另外安装。
npm install express-generator
Error: Can’t set headers after they are sent to the client
callback twice was my issue.